Thanks to you and Clarkley for your response.
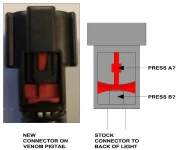
I was easily able to get the red tab to pull back without any tools. I am now at the release phase, and my connector doesn't have the black button in the middle to push down. I played around with the Venom pigtail connector, and that one is straight forward and easy to manipulate, but the stock connector into the light housing is different. I think the red square in my diagram, (A) is where the release is, but it is so small compared to the black button on the other connector that it has been a challenge. The red square is flush with the black plastic around it so I cannot depress it with a finger, I will have to use a small tool to push it down. On the driver side I can get two hands up in there, but as I'm sure you know, on the passenger side all of this has to happen with one hand...
I will give it another go later today or early tomorrow morning.
Thanks again for the responses.


")
")