TravisJr
Active member
So I took a lot of ideas and advice from this thread and put my own spin on it. Don’t want to hijack things, but I figured that having all the footwell lighting ideas in one spot might be helpful for future users. I decided to use VLED bar lighting placed in strategic locations throughout the cab. They have a lot of plug-and-play options for enhancing vehicles with existing footwell lighting, and I have used them previously to good effect in my Tundra.
https://www.vleds.com/shop-products/light-bars.html
Essentially, they are dasiy-chainable LED lights, pre-wired with male and female connectors. All you need to do is determine the amount and length of extensions you need to chain the lights together, and a power/ground pigtail at the start of the chain. They have both standard configuration (wiring runs from the ends of the light bar) and what they call “side exit”, where the wiring runs from the center. I used both, depending on the specifics of the mounting location.
Standard vs side exit:

My original plan (which sprawled a little at the end) was to put one bar under the dash in front of both the driver and passenger seats, and also to add a single light bar to the side pockets of the center console. I could tell that there was a seam in the trim there that would be perfect for running the wiring for the side pocket lights. So one pigtail for power, four lights, two y-splitters, a two-foot extension (to run behind the dash from driver to passenger sides) and two one-foot extensions (to run from the y-splitters back to the console pockets). I could then continue the chair rearward if I wanted to add rear-facing lights under the seats.
May be a little difficult to make out on the ground, but here’s the general signal chain laid out ahead of time:

That said, I got to work. Trim removal is pretty straightforward, and only required removing the inner kick panels/console sides. Once they’re out, you have plenty of access to run the wiring across the cab and back down the console.
Kick panels removed:


Plenty easy to run wiring side to side:

Natural gap in trim where side pocket lights can ride:

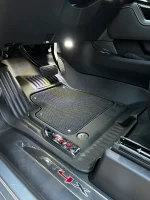
The lights come with double sided adhesive pads, velcro pads, and zip ties to give you a variety of mounting options. In most places, I used a combination of the adhesive pad with zip ties for added security. Driver’s side footwell light was easy to mount on the under dash A/C vent, and was just about the perfect position for the power and ground wires to run. I used a standard light here.

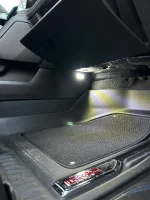
Passenger side I used a side exit light. The wires run up under the jute padding under the dash and essentially hold the light in perfect position. I didn’t use any attachments at all here.


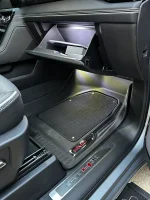
I then came back alongside the console from the y-splitters. A one-foot extension on either side is all it takes, and the wiring hides nicely in the natural voids of trim pieces. I again used the side exit lights, which keeps the wiring practically invisible. This was about the only place where I didn’t have the option of backing up the sticky pads with zip ties, so I was sure to degrease the underside of the trim and use 3M adhesion promoter. Once in place, everything buttoned up nicely.

**At this point, I’ve hit my photo limit for a single post, so I’m going to split this into separate posts. Stand by for Part II shortly…**
https://www.vleds.com/shop-products/light-bars.html
Essentially, they are dasiy-chainable LED lights, pre-wired with male and female connectors. All you need to do is determine the amount and length of extensions you need to chain the lights together, and a power/ground pigtail at the start of the chain. They have both standard configuration (wiring runs from the ends of the light bar) and what they call “side exit”, where the wiring runs from the center. I used both, depending on the specifics of the mounting location.
Standard vs side exit:
My original plan (which sprawled a little at the end) was to put one bar under the dash in front of both the driver and passenger seats, and also to add a single light bar to the side pockets of the center console. I could tell that there was a seam in the trim there that would be perfect for running the wiring for the side pocket lights. So one pigtail for power, four lights, two y-splitters, a two-foot extension (to run behind the dash from driver to passenger sides) and two one-foot extensions (to run from the y-splitters back to the console pockets). I could then continue the chair rearward if I wanted to add rear-facing lights under the seats.
May be a little difficult to make out on the ground, but here’s the general signal chain laid out ahead of time:
That said, I got to work. Trim removal is pretty straightforward, and only required removing the inner kick panels/console sides. Once they’re out, you have plenty of access to run the wiring across the cab and back down the console.
Kick panels removed:
Plenty easy to run wiring side to side:
Natural gap in trim where side pocket lights can ride:
The lights come with double sided adhesive pads, velcro pads, and zip ties to give you a variety of mounting options. In most places, I used a combination of the adhesive pad with zip ties for added security. Driver’s side footwell light was easy to mount on the under dash A/C vent, and was just about the perfect position for the power and ground wires to run. I used a standard light here.
Passenger side I used a side exit light. The wires run up under the jute padding under the dash and essentially hold the light in perfect position. I didn’t use any attachments at all here.
I then came back alongside the console from the y-splitters. A one-foot extension on either side is all it takes, and the wiring hides nicely in the natural voids of trim pieces. I again used the side exit lights, which keeps the wiring practically invisible. This was about the only place where I didn’t have the option of backing up the sticky pads with zip ties, so I was sure to degrease the underside of the trim and use 3M adhesion promoter. Once in place, everything buttoned up nicely.
**At this point, I’ve hit my photo limit for a single post, so I’m going to split this into separate posts. Stand by for Part II shortly…**