2024 2500 Mod Progress

I just found your post and your story sounds much like mine. I have never thought I needed a 3/4 ton but once I figured out its about the same price as a 1/2 ton I really stared liking the idea. For 2024 I dont like any of the 1500 factory wheels but I love the black standard 2500 wheels like you have. If I add the price of wheels to the 1500 its the same as a 2500.

I may copy many of your mods but I would really appreciate a link to the mod to allow the fogs on when high beams are on. On my Jeeps I have been able to do that but never cracked the code on my GMC.
No problem!
https://boostautoparts.com/products/6hi
 

Following that, I spent a ridiculous amount of money for black OEM emblems and fender badges. I would’ve gone eBay on these as well, but couldn’t find anyone selling similar fender vents/badges, the new bumper-side badges, or the front grille AT4. Original emblems were removed with soft pry tools, no heat, and the bulk of the adhesive with a 3M wheel. I follow that with WD-40 and a microfiber towel and then isopropyl alcohol before placing new emblems. I used the GM instructions I posted in my other thread, painters tape, and measuring calipers for locating the new emblems. The fender vent and bumper badges pop right off and snap back in place without adhesive. The AT4 on the front grille is an absolute bitch to get off. Remove the radiator cowl under the hood and violently yank your brand new grille towards yourself to disconnect the clips. It will still be bolted to the truck on each side behind the fenders. Use a towel or something to keep the grille pulled forward and use a long screwdriver to break the tabs off the back of the emblem. The new one snaps right back in.

My truck is filthy from the long drive home, so pardon my mess.
Where did you post the gmc instructions. Can you possibly send them to me. I am having trouble locating them on their site or your post. Thank you in advance
 

Where did you post the gmc instructions. Can you possibly send them to me. I am having trouble locating them on their site or your post. Thank you in advance
Here ya go, bud.
 

My truck lost a couple lbs today!
Sounds great, but I may add a resonator upstream to tone it down a hair. It’s not loud, just a little resonant around 1800 rpm, like when driving around a neighborhood.
Magnaflow 14161
3.5” in/out 6x14” body
Magnaflow 35237
3.5” in/5” out tip

IMG_4696.jpegIMG_4697.jpegIMG_4705.jpegIMG_4704.jpegIMG_4706.jpegIMG_4707.jpegIMG_4686.jpegIMG_4685.jpegIMG_4691.jpeg
 

Truck Looks Great man. I am also going for the completely murdered out look. I plan on taking my truck to the paint shop to get all of the "Vader Chrome" painted gloss black. Looking at getting my headlights done and my tail lights and 3rd brake light tinted to finish the Black out.
 

Following that, I spent a ridiculous amount of money for black OEM emblems and fender badges. I would’ve gone eBay on these as well, but couldn’t find anyone selling similar fender vents/badges, the new bumper-side badges, or the front grille AT4. Original emblems were removed with soft pry tools, no heat, and the bulk of the adhesive with a 3M wheel. I follow that with WD-40 and a microfiber towel and then isopropyl alcohol before placing new emblems. I used the GM instructions I posted in my other thread, painters tape, and measuring calipers for locating the new emblems. The fender vent and bumper badges pop right off and snap back in place without adhesive. The AT4 on the front grille is an absolute bitch to get off. Remove the radiator cowl under the hood and violently yank your brand new grille towards yourself to disconnect the clips. It will still be bolted to the truck on each side behind the fenders. Use a towel or something to keep the grille pulled forward and use a long screwdriver to break the tabs off the back of the emblem. The new one snaps right back in.

My truck is filthy from the long drive home, so pardon my mess.
I’m looking at blacking out my 24 denali but the front is turning out to be tricky. I was thinking about swapping the grill out for an at4 grill but was curious if the at4 in the bottom right of the grill can be completely removed
 

I’m looking at blacking out my 24 denali but the front is turning out to be tricky. I was thinking about swapping the grill out for an at4 grill but was curious if the at4 in the bottom right of the grill can be completely removed
If I remember right, yes. I don't believe anything will look weird without it.
 

If you:
•Own a 2500 AT4X, and/or
•Removed the air deflector on your AT4 HD, and
•Are a little ridiculous…
These trim plugs will fill the unsightly holes in the bottom of your bumper that no one can see or cares about so you can finally sleep at night. The kit is on sale for $11 and even comes with a set of trim/pry tools. https://a.co/d/2g4Cqwl
 

Attachments

  • IMG_4791.jpeg
    IMG_4791.jpeg
    338.6 KB · Views: 10
  • IMG_4793.jpeg
    IMG_4793.jpeg
    322.8 KB · Views: 12
  • IMG_4794.jpeg
    IMG_4794.jpeg
    350.3 KB · Views: 11
  • IMG_4792.jpeg
    IMG_4792.jpeg
    289.7 KB · Views: 12
If you:
•Own a 2500 AT4X, and/or
•Removed the air deflector on your AT4 HD, and
•Are a little ridiculous…
These trim plugs will fill the unsightly holes in the bottom of your bumper that no one can see or cares about so you can finally sleep at night. The kit is on sale for $11 and even comes with a set of trim/pry tools. https://a.co/d/2g4Cqwl
are those the same plugs that fit in top of the front fender liner?
 

Made a little progress on my audio upgrades last night, but long way to go.
I refused to give up all of my underseat storage for a sub box, so this is the route I went. SubThump single sealed 12”, and I picked up the storage bin from marketplace-my truck didn’t come with it. It doesn’t look as nice as a fully-built enclosure, but I’m pretty content with how it turned out. I rough cut the box with a sawzall, then detail cut with a dremel. Cleaned up the edges by backdragging a razor and finished off with a torch. If you try this, do it outside or have your leaf blower handy; it makes one Hell of a mess. 😅 
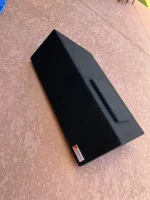
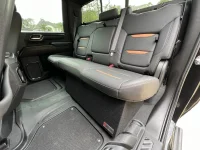
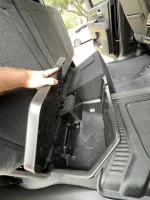
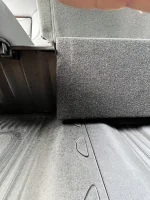
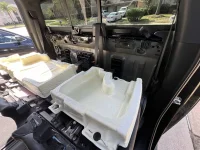
I worried the sub might strike the lip of the floor mat, so I trimmed it back with scissors, a razor, and again finished off with a torch.

My truck originally came with this thing. Kinda worthless.
84525974.jpg

Replaced with this guy:
s-l1200.jpg
 

Attachments

  • IMG_4646.jpeg
    IMG_4646.jpeg
    374 KB · Views: 14
  • IMG_4647.jpeg
    IMG_4647.jpeg
    530.4 KB · Views: 13
  • IMG_4803.jpeg
    IMG_4803.jpeg
    391.7 KB · Views: 14
  • IMG_4802.jpeg
    IMG_4802.jpeg
    447.2 KB · Views: 12
  • IMG_4805.jpeg
    IMG_4805.jpeg
    437 KB · Views: 13
  • IMG_4804.jpeg
    IMG_4804.jpeg
    584.1 KB · Views: 12
Last edited:
With a little YouTube and stubbornness, there’s nothing you can’t do.
I’ve heard several times how much of a pain these seats are. They’re no joke, but I found a super helpful video and had them out in about 20 minutes, including tool-hunting delays. I had a little time today, so decided to test-fit the amp rack and nail down where I can/can’t mount my amps. My Dremel made short work of a problematic mounting point, and I think I’ve sorted out my rack. Time to mount and wire up! I have sound treatment going in next. That cab wall is LOUD without the seat on it!
 

Attachments

  • IMG_4815.jpeg
    IMG_4815.jpeg
    385 KB · Views: 13
  • IMG_4818.jpeg
    IMG_4818.jpeg
    379 KB · Views: 11
  • IMG_4819.jpeg
    IMG_4819.jpeg
    455.2 KB · Views: 11

New Posts

Back
Top