Ron's White 6.2L 2023 project

So I finally took a couple of pictures of my ditch lights today..

So I decided I wanted to be illuminate the sides of the roads and install ditch lights. There don't seem to be any brackets for the 2023 trucks so I needed to improvise. I purchased the Tacoma brackets linked below and modified them with 2 bends each to match the profile brackets. I also needed to trim the trim on the cowl to clear them. Oddly a piece of blue painters tape I was using to protect the paint was the perfect size to measure the depth I needed to cut and the angle I just eyeballed by seeing where it was making contact as I lowered the hood. I ended up with somewhere between an 1/8" and 1/16" of clearance.

I found that if I pushed the brackets all the way forward, I had no clearance issues with the hood or windshield.. hood up or down.

For wiring I cut down the Baja Designs harness and used some rubber covered tubing clamps and the existing plastic clips to run it across the top of the firewall. For I while I had it running inside the cowl and that was fine too, I just wanted more positive control of the wire.

For me the switching was easy I just added it to a blank spot on my Switch-Pros panel. "Front" is the S2 Pros and the Onyx-6. The back-up lights are the S1's and they come on as courtesy lights and with my reverse lights. The rock lights come on with my parking lights if that wasn't mentioned before.

LED Light Pod Metal Hood Mount Bracket Kit/Ditch Hood Light Brackets Compatible with 2005-2015 Toyota Tacoma - Black.
 

Attachments

  • 20230902_093334.webp
    20230902_093334.webp
    97.3 KB · Views: 210
  • 20230902_093644.webp
    20230902_093644.webp
    311.8 KB · Views: 212
  • 20230902_093628.webp
    20230902_093628.webp
    319.3 KB · Views: 208
  • 20230902_093604.webp
    20230902_093604.webp
    313.1 KB · Views: 208
  • 20230902_093534.webp
    20230902_093534.webp
    114.6 KB · Views: 205
  • 20230902_093523.webp
    20230902_093523.webp
    111.5 KB · Views: 211
  • 20230902_093431.webp
    20230902_093431.webp
    136.1 KB · Views: 196
  • 20230902_093412.webp
    20230902_093412.webp
    167.1 KB · Views: 200
  • 20230902_093400.webp
    20230902_093400.webp
    361.5 KB · Views: 202
  • 20230902_093351.webp
    20230902_093351.webp
    142.3 KB · Views: 204
So I finally took a couple of pictures of my ditch lights today..

So I decided I wanted to be illuminate the sides of the roads and install ditch lights. There don't seem to be any brackets for the 2023 trucks so I needed to improvise. I purchased the Tacoma brackets linked below and modified them with 2 bends each to match the profile brackets. I also needed to trim the trim on the cowl to clear them. Oddly a piece of blue painters tape I was using to protect the paint was the perfect size to measure the depth I needed to cut and the angle I just eyeballed by seeing where it was making contact as I lowered the hood. I ended up with somewhere between an 1/8" and 1/16" of clearance.

I found that if I pushed the brackets all the way forward, I had no clearance issues with the hood or windshield.. hood up or down.

For wiring I cut down the Baja Designs harness and used some rubber covered tubing clamps and the existing plastic clips to run it across the top of the firewall. For I while I had it running inside the cowl and that was fine too, I just wanted more positive control of the wire.

For me the switching was easy I just added it to a blank spot on my Switch-Pros panel. "Front" is the S2 Pros and the Onyx-6. The back-up lights are the S1's and they come on as courtesy lights and with my reverse lights. The rock lights come on with my parking lights if that wasn't mentioned before.

LED Light Pod Metal Hood Mount Bracket Kit/Ditch Hood Light Brackets Compatible with 2005-2015 Toyota Tacoma - Black.


I believe Putco has brackets. That is what I used for my ditch lights


I have these same brackets for my ditch lights on the refresh 2022 version. Did they change the hood on the refresh 2023's?
The bolts on the 2023's are not in the same plane so a flat bar like the one in the photo will need to be bent twice to fit flush. I had to make those bends in the brackets I used as well... but the ones I used are cheaper and the slots allowed for some forgiveness in the hole locations, where if you bent the Putco's if they were in the right place originally, they shouldn't be after bending.

This is why I posted the photos of the hinge above... but maybe I should take one of the side profile as well.
 

It has been a minute since there was anything I wanted to change on the truck enough to do it. I decided I needed a better storage solution under the rear seat so I whipped this up... Nothing special just 3 pieces of 1/2" plywood I had in the garage and I covered it with bunk carpet (from a boat trailer) that I found on Amazon. So far I am in it about $50.

This will also serve as a spine for a removable flat floor for my dogs.

I also noticed this thread doesn't have my Milwaukee Packout bed system in it either. If I have time I'll add it over the 4th. If you're interested in it let me know and that might encourage me more.
 

Attachments

  • 20240702_205719.webp
    20240702_205719.webp
    138.8 KB · Views: 104
  • 20240702_205727.webp
    20240702_205727.webp
    120.3 KB · Views: 111
Kind of funny the last 2 posts are addressing the same issue. The desire to have storage that is hidden from outside of the truck when the door is open.

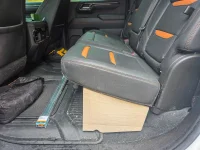
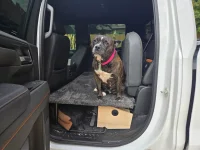
The box I had before was perfect when I was using the backseat a lot for my kids, but my youngest went to college this fall and I have had the platform mentioned in the previous post in most of the time. (Once I modify it for this box I will make a post on it too) The platform give the dogs a much better area to ride in the truck, it makes carrying bigger items much easier, and gives me additional hidden storage under it as well.
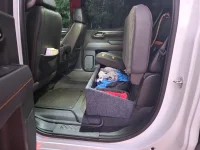
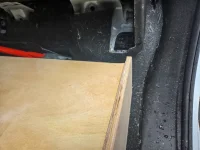
However, it was not built in a way that allowed me to access my hidden under seat storage easily... which was the whole purpose of building it!

So this is version 2 and I thought someone might find it helpful to see it before I covered or painted it.

V2 is a couple inches longer than the 1st one, but the curvature of the seat forced me to make it a couple inches narrower. If I do a V3, I will revert to the previous dimensions. The drawer is on 24" slides that are current marked to to under $13 at Lowes (normally $27.xx) and is longer on 1 side than the other. This allowed me to keep longer items in the drawer, and still maintain the factory jack position. I am still deciding what I want to do with the other side... cubby, hinged door, "curtain"... dunno... suggestions are welcome.

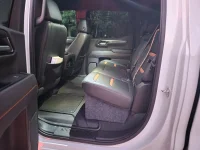
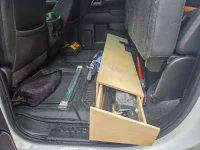
The next steps are to make a tie to attach the box to the seat bolts in the 2nd photo to keep it from moving and help honestish people stay honester, then I am going to go 1 of 2 ways.

1) Paint this black and then make 2 boxes that sit in the floor in a 60/40 split to give me the option to have a 3rd person and a flat floor.

2) Paint this black, with velcro covering the front so I can stick my first aid kit, umbrellas, etc to it and then modify the existing platform for the dogs (Maybe in a 60/40 split).

Other than that the only updates are 34" Nitto Trail Grapplers when the Goodyears got louder than the stereo and nifty "Stay Back" stickers on the windows. I tell people it is because of the dogs because 1 is old and cranky, 1 gets nervous and nips, and 1 isn't afraid of anything and bites because she wants to... but secretly it is because I don't want to deal with people ;)
 

Attachments

  • 20251028_133211.webp
    20251028_133211.webp
    211.3 KB · Views: 13
  • 20251028_133155.webp
    20251028_133155.webp
    192 KB · Views: 11
  • 20251028_133130.webp
    20251028_133130.webp
    95.4 KB · Views: 10
  • 20251028_133051.webp
    20251028_133051.webp
    112.4 KB · Views: 11
  • 20251028_133040.webp
    20251028_133040.webp
    184.5 KB · Views: 13
Oh 3 more things...

1) if you are in Charlotte and want V1. Message me.
2) looks like the box moved. The notches actually sit on the mat correctly.
3) Yes my truck needs cleaned
 

Quick photo showing the dog's platform. It is 3/4 plywood covered in a carpet rug. The front is supported with Amazon sourced adjustable bed legs. There are also smaller plywood legs resting on the box. The model is Ms. Stella.
 

Attachments

  • 20251030_151953.webp
    20251030_151953.webp
    152.8 KB · Views: 7

Most reactions

Back
Top