Northwest4X
Member
Hi all, finished up my winch install over the holidays and finally getting around to sharing for anyone else running an AT4X HD AEV and considering something other than the ComeUp.
Overall, the install is pretty straightforward once you know the quirks, but I wouldn’t call it beginner-friendly. As others have mentioned, this can be done in a day—figure ~5–7 hours depending on whether you’re solo, how organized you are, and how much time you spend triple-checking fitment before final torque.
Winch & Fitment Notes
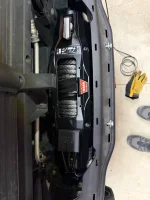
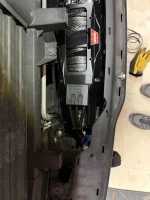
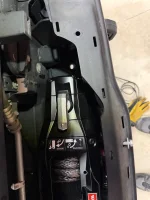
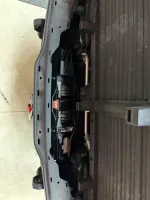
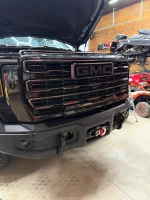
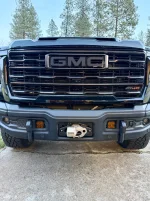
I installed a Warn Zeon XD 12S into the factory AEV bumper on the AT4X HD AEV. No bumper removal, no trimming, no permanent modifications.
The biggest (and really only) fitment challenge with the Warn Zeon platform is vertical alignment:
For spacers, I ended up using a stack of six Grade 8 steel washers per bolt after chatting with a couple friends who work with metals more than I do.
Controller Relocation & Wiring
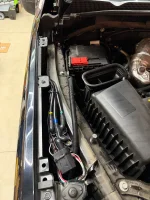
I did use the Warn controller relocation kit. I wanted the controller pack moved up into a cleaner, more protected area, and I’m using the left fender gap intentionally since I plan to leave the HUB Bluetooth receiver plugged in full time.
That said, if you’re running the XD model (about $1k less than the XP), there does appear to be potentially enough room to leave the controller mounted directly on the winch and run it as a more traditional setup if you remove the secondary trim piece. I didn’t test this configuration since it wasn’t my intent, but visually and dimensionally it looks potentially doable.
My plan is a semi-permanent setup using:
If you’re debating which model to go with, I think it really comes down to clutch preference and control style.
Install Observations / Tips
A few additional takeaways that might save time or frustration:
Hopefully this helps the next AT4X HD AEV owner who wants to run a Warn without reinventing the wheel. If anyone has questions—or wants specifics on bolt lengths, washer counts, wiring paths, or torque—feel free to reach out. Happy to help.
Overall, the install is pretty straightforward once you know the quirks, but I wouldn’t call it beginner-friendly. As others have mentioned, this can be done in a day—figure ~5–7 hours depending on whether you’re solo, how organized you are, and how much time you spend triple-checking fitment before final torque.
Winch & Fitment Notes
I installed a Warn Zeon XD 12S into the factory AEV bumper on the AT4X HD AEV. No bumper removal, no trimming, no permanent modifications.
The biggest (and really only) fitment challenge with the Warn Zeon platform is vertical alignment:
- You must use 3/4” spacers between the winch feet and the AEV mounting plate
- You’ll also need four Grade 8 mounting bolts that are 3/4” longer than stock
For spacers, I ended up using a stack of six Grade 8 steel washers per bolt after chatting with a couple friends who work with metals more than I do.
- From an ease-of-install perspective, the washer stacks take a bit more patience to get perfectly lined up during initial positioning
- Keeping everything steel-on-steel felt like the smarter long-term move to avoid corrosion or galvanic issues
- I did look at aluminum spacers, which likely would have been easier to align, but they had a little more play
- I liked how tightly the washers fit the bolt shank—once torqued, there’s no chance for movement
Controller Relocation & Wiring
I did use the Warn controller relocation kit. I wanted the controller pack moved up into a cleaner, more protected area, and I’m using the left fender gap intentionally since I plan to leave the HUB Bluetooth receiver plugged in full time.
That said, if you’re running the XD model (about $1k less than the XP), there does appear to be potentially enough room to leave the controller mounted directly on the winch and run it as a more traditional setup if you remove the secondary trim piece. I didn’t test this configuration since it wasn’t my intent, but visually and dimensionally it looks potentially doable.
My plan is a semi-permanent setup using:
- Warn HUB Bluetooth control
- Winch power routed through a Diode Dynamics D-Switch as a cutoff
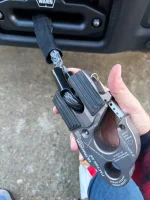
If you’re debating which model to go with, I think it really comes down to clutch preference and control style.
- The XP includes a wireless winch remote and remote/electronic clutch, which allows you to leave the secondary trim piece installed
- The XD uses a traditional manual clutch, which means removing the secondary trim piece for easy access
Install Observations / Tips
A few additional takeaways that might save time or frustration:
- Unbolting the clutch-side housing during installation gives you the clearance needed to slide the winch into position; once mounted, simply re-torque it to spec
- Test-fit everything before final torque, especially with stacked spacers
- Cable routing and cleanup takes longer than expected; don’t rush it
- You absolutely do not need to remove the bumper but rather just the grill and skid plates
Hopefully this helps the next AT4X HD AEV owner who wants to run a Warn without reinventing the wheel. If anyone has questions—or wants specifics on bolt lengths, washer counts, wiring paths, or torque—feel free to reach out. Happy to help.


Attachments
-
 IMG_2238.webp273.5 KB · Views: 22
 -
 IMG_2241.webp130.1 KB · Views: 10
 -
 IMG_2242.webp127.5 KB · Views: 10
 -
 IMG_2243.webp128.5 KB · Views: 11
 -
 IMG_2247.webp99.5 KB · Views: 10
 -
 IMG_2249.webp107.1 KB · Views: 11
 -
 IMG_2256.webp208.8 KB · Views: 11
 -
 IMG_2257.webp207.7 KB · Views: 12
 -
 IMG_2272.webp119.9 KB · Views: 14
 -
 IMG_2278.webp401.6 KB · Views: 13
Last edited:


