Aries® - 3.3" ActionTrac™ Retractable Black Running Boards.

poopster

Active member
Joined
Dec 18, 2022
Messages
278
Reaction score
90
Location
Western New York
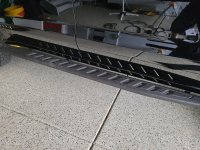
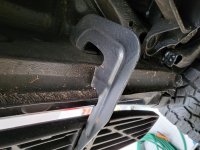
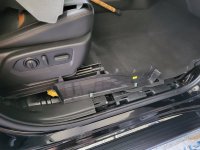
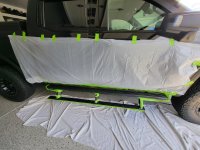
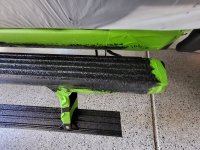
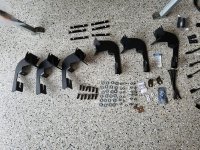
I finally got around to installing the Aries® - 3.3" ActionTrac™ Retractable Black Running Boards.

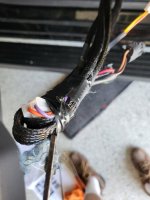
I’ll try to describe each step. BTW, in the instructions they used a 2017 Ford F-250 for this demonstration. With that being said, the battery on the Ford was on the drivers’ side but on my truck the battery is on the passenger side. So, extra wiring was required, which they provided but was not long enough to reach.

These pictures are not very professional.

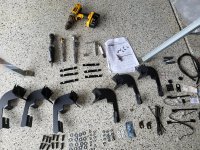
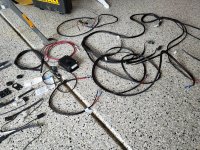
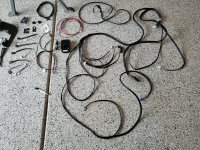
First, I laid out all the parts including the wiring harness to be sure I had everything.
 

Attachments

  • 20230807_090530.jpg
    20230807_090530.jpg
    490.1 KB · Views: 81
  • 20230807_094453.jpg
    20230807_094453.jpg
    898.7 KB · Views: 41
  • 20230807_094448.jpg
    20230807_094448.jpg
    814.1 KB · Views: 28
  • 20230807_094443.jpg
    20230807_094443.jpg
    774.6 KB · Views: 28
  • 20230807_094055.jpg
    20230807_094055.jpg
    822.5 KB · Views: 39
  • 20230807_094051.jpg
    20230807_094051.jpg
    773.3 KB · Views: 37
  • 20230807_094047.jpg
    20230807_094047.jpg
    731 KB · Views: 31
  • 20230807_092152.jpg
    20230807_092152.jpg
    886.5 KB · Views: 27
  • 20230807_092138.jpg
    20230807_092138.jpg
    837 KB · Views: 35
Then I removed the existing running boards (heavy) from my truck and put them aside with all the brackets and nuts. I don’t know if I’ll sell them or keep them along with the tires and wheels that I took off the truck for a later date.
 

Attachments

  • 20230807_094529.jpg
    20230807_094529.jpg
    589.4 KB · Views: 42
  • 20230807_094545.jpg
    20230807_094545.jpg
    258.3 KB · Views: 37
  • 20230807_094557.jpg
    20230807_094557.jpg
    267.3 KB · Views: 43
  • 20230807_094604.jpg
    20230807_094604.jpg
    334.2 KB · Views: 46
Next, I installed the new brackets in the same position that the old ones were. Then the new running boards, which were sort of heavy and lined them up exactly where I wanted them.

Now would be the time to say an extra set of hands would have made this installation much easier.
Then I had to remove the door sill protector and side panels, being very careful not to break them.
 

Attachments

  • 20230809_110848.jpg
    20230809_110848.jpg
    242.5 KB · Views: 51
  • 20230809_110911.jpg
    20230809_110911.jpg
    302.1 KB · Views: 47
  • 20230809_110914.jpg
    20230809_110914.jpg
    316.5 KB · Views: 42
Then, I had to fish the wiring harness under the carpet in the rear, from the passenger side to the driver side. Here I used an electrician’s fish wire which made it very easy to get the wires from one side of the truck to the other.
 

Attachments

  • 20230809_110747.jpg
    20230809_110747.jpg
    353.9 KB · Views: 40
  • 20230809_111225.jpg
    20230809_111225.jpg
    238.9 KB · Views: 32
Next, I had to drill a hole through the floor on both sides to pass the power wire and wire for the LED light, that lights the running board when it deploys. I used a small box to prop up the carpet for better access. A gromet is provided for each side and wire loom to make the wiring look neater and protect those wires underneath the truck.
 

Attachments

  • 20230809_115216.jpg
    20230809_115216.jpg
    390.4 KB · Views: 26
  • 20230809_115230.jpg
    20230809_115230.jpg
    286.7 KB · Views: 33
Next, I fed the wires for the power to the battery (a fused line), door sensors and power switch which was a lighted toggle switch (that was defective), to the front of the truck on the driver’s side. Next, I connected the power line, without the fuse in it and was supposed to drill a hole somewhere in the dash for the toggle switch but there is no convenient place for it, so I just stuffed it under the dash. I can easily reach under to turn the off the switch if desired.

Then, I put the sensors on the door jam and the magnet on the door itself to line up with the sensor on the door jam. Done!
 

I tried to deploy the running boards but only the drivers side would work. I double checked all the wire connections, which was a PITA, only to find a broken wire at the connector that plugged into the door sensor on the passenger rear door. That wire must have come from the factory broken because it was broken off right where it connected to the plug. Anyway, I cut it off and stripped both wires and soldered them together for a secure connection. Then the running boards deployed with a bang which startled me. I’m getting used to that bang when they open, and they are very quiet when they close.
These running boards are very sturdy but could be slippery in the rain or winter. So, I’m going to coat them with Herculiner truck bed liner and hopefully that will solve that problem.

The Herculiner went on very easily, looks great and is not slippery at all. I applied it a bit heavy and then rolled it with a course roller and that made the finish very rough. Just what I wanted. I waited 2 hours before applying the 2nd coat and still had a little product left.
 

Attachments

  • 20230827_125400.jpg
    20230827_125400.jpg
    345.3 KB · Views: 64
  • 20230827_125419.jpg
    20230827_125419.jpg
    349.1 KB · Views: 59
  • 20230827_133833.jpg
    20230827_133833.jpg
    387.4 KB · Views: 55
  • 20230827_133838.jpg
    20230827_133838.jpg
    373.6 KB · Views: 60
  • 20230827_133847.jpg
    20230827_133847.jpg
    351 KB · Views: 61
  • 20230827_133902.jpg
    20230827_133902.jpg
    486.4 KB · Views: 60
  • 20230827_133909.jpg
    20230827_133909.jpg
    481.7 KB · Views: 60
  • 20230827_133916.jpg
    20230827_133916.jpg
    415.6 KB · Views: 56
  • 20230827_133945.jpg
    20230827_133945.jpg
    299.4 KB · Views: 50
  • 1000001175.jpg
    1000001175.jpg
    110.8 KB · Views: 62
I have to say, these running boards are well built but the instructions leave much to be desired. The video makes the installation look much easier than it is but was a big help. I’m sure they practiced the installation process before making the video, besides the truck was on a lift so there was no climbing on the floor under the truck. If anyone plans to install them, they should have an extra set of hands for the difficult parts.
These running boards are a bit pricy and only time will tell if it was worth what I paid, but they made my life much better because my wife is no longer complaining about how difficult it is to get into the truck.

One other note, I wish the running boards were a little wider. Getting into the truck is OK, but getting out is a bit awkward, something that I will have to get used to.

I’ll let everyone know how these boards are holding up, especially during the winter months. But I must admit that I park in the garage, so my truck does not sit out in the elements for very long.
These are Aries instructions:

Aries® - 3.3" ActionTrac™ Retractable Black Running Boards (carid.com)
 

Heck of a job. Great write up and really appreciate your comment about you wished they were wider.
Have you ever had Amp steps to compare? I have the Rhino RB20 similar to the High clearance GMC steps that you removed and they're pretty worthless for a big guy getting in and out.
I've had my truck since May this year and if I don't find a good step, I know I'll wear that seat bolster out pretty quick sliding in and out.
Thanks again for documenting your install
Thanks, it was a pretty long install and like I said it would have gone much faster with a second set of hands. The Hercliner on the steps worked out really well. My wife thought for sure that the steps would be slippery in the rain and winter. I've seen a video of the AMP steps but bought these simply because they had 2 steps with one closer to the ground. With the lift, level and big tires, it was a big step up into the truck, I could do it, but my wife was complaining right from the get-go.
Also, I need to post a video of the steps opening and closing.
And I'm sorry that I had to use 8 posts to get all the photos posted but I didn't know how to get them all on one page.
I just looked at the AMP power step video and see that they offer an "extreme" version
of the steps that deploy a 6" step lower than the original BUT are much more than I paid for the steps I installed on my truck. Truth be told, I actually like the AMP steps a little better than the Aries but think my wife likes the idea of 2 steps.
I've been meaning to post this picture of the running boards opening and closing:
(here: https://realtruck.com/p/amp-research-powerstep-xtreme-running-boards/)
 

Attachments

  • 20230904_133537.mp4
    15.9 MB
Last edited:
Back
Top